.jpg?width=335&name=scott-blake-s9XDWLJ_LyE-unsplash%20(1).jpg) Note: Before you begin to assemble the Turbo-Rail fall protection railing, it is important to read all safety warnings and information in the Garlock Turbo-Rail Operator’s Instruction Manual carefully.
Note: Before you begin to assemble the Turbo-Rail fall protection railing, it is important to read all safety warnings and information in the Garlock Turbo-Rail Operator’s Instruction Manual carefully.
The Garlock Turbo-Rail fall protection railing system creates a sturdy perimeter that prevents accidents while working near roof edges. The Turbo-Rail is OSHA-compliant and does not need to be bolted to the roof deck.
The following instructions will walk you through how to install a Garlock Turbo-Rail fall protection railing system to a parapet wall. These instructions were written using information from the Turbo-Rail manual and from Hy-Tech professionals.
If you have any questions about the Garlock Turbo-Rail or want more information on Garlock products, please contact Hy-Tech at 800-635-0384 or at info@hy-techroof.com.
Before Beginning Take The Following Safety Precautions
When installing the Turbo-Rail at a roof edge, all workers must be tied off to an OSHA-approved fall arrest system. Visit Hy-Tech’s website to find fall arrest carts, lifelines and harnesses that comply with OSHA regulations.
Also, make sure that the roof is free of debris, water, snow/ice, oil or other material that may create a tripping or slipping hazard.
Installing the Turbo-Rail
Attach the Clamps and Stanchions
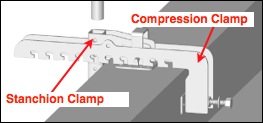
Each combo clamp is made up of two parts: a stanchion clamp and compression clamp. As described below, the two work together to bracket the parapet wall and create a secure base for the Turbo-Rail.
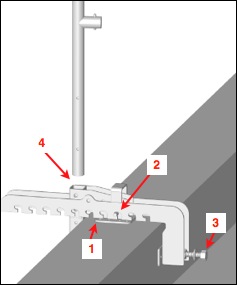 1. Place the stanchion clamp on the parapet wall so that the flat panels lay against the exterior and top of the wall, and so that the stanchion slot points straight up, as shown right.
2. Next, slide the compression clamp’s notches over the stanchion clamp pegs so that the compression clamp’s flat panel aligns with the interior of the parapet wall. Get them as close together as possible.
3. Tighten the bolt on the compression clamp with a 1-1/4-in. wrench until the clamp is securely locked in place.
4. Slide the stanchion into the clamp’s bracket until it is approximately 42 in. above the roof’s walking surface. Lock the stanchion in place by inserting the locking pin through the stanchion clamp and stanchion pinhole.
There are two holes near the bottom of the stanchion for the locking pin, and the stanchion clamp offers pinholes every 3 in., giving you flexibility when it comes to railing height.
Install the Railings and Line Up the Next Clamp
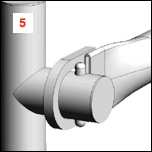
5. Squeeze the pop pins on one of the stanchion’s railing pegs (there are two, a top and middle peg). Slide the looped end of a 10-ft. railing over the peg, and release the pop pins, which should pop out and lock the railing in place. Do the same for the other peg.
6. Using Step 4, slide the second stanchion into the stanchion clamp and insert the locking pin through the same holes as the installed stanchion so they are the same height.
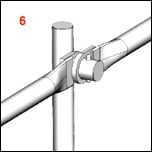
7. Using Step 5, secure the 10-ft. railings to the uninstalled stanchion’s top and middle pegs.
8. Move the uninstalled stanchion with attached stanchion clamp as far away from the installed stanchion as the 10 ft. railing will allow. When done, align the stanchion clamp on the parapet as you did in Step 1, and then install the compression clamp using Steps 2 and 3.
Repeat Steps 5 through 8 to create a straight barrier along the parapet wall.
Managing Corners
If, as you approach a corner, you are less than 10 ft. away, replace the 10-ft. railing with either the 33-48-in. adjustable railing or 5-8-ft. adjustable railing depending on how far away from the corner you are. When possible, you want the end stanchion and clamp to line up perfectly with the corner.
This way, you can start the adjacent railing with a stanchion that butts up against the last stanchion on the other railing, without having to fill any gaps someone could fall through.
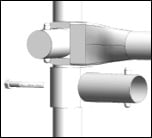 If, after you install the last railing, you are less than 33 in. from the corner, you will need to use the corner adaptor to attach the perpendicular railings. Corner adaptors simply slide onto the stanchions and tighten down with a locking bolt, but give you flexibility with respect to the angle at which the railing attaches to the stanchion.
Proceed using Steps 5 through 8 until the entire roof perimeter is sealed and gap-free.
If you have any questions regarding installation, or need any support, please contact Hy-Tech at 800-635-0384 or at info@hy-techroof.com.

Garlock Fall-Prevention Equipment Brochure
Garlock safety equipment is built to provide rock-solid fall-protection for your crews. Learn about their perimeter guardrails, warning line systems, skylight and hatch kits, and fall-protection carts. Download Hy-Tech's Garlock Fall-Prevention Brochure to learn more.